A (Confusing) Season of Sap and Syrup
A (Confusing) Season of Sap and Syrup

If you've been following along on our Facebook farm page, then you'll know Pippa and I have been elbow deep in maple syrup making! This year we kickstarted a new project at MinIsland Farm called our Maple Tree Share. Basically, you pay a small fee for us to come tap your trees, collect the sap, and boil down the sap into syrup. In return, you get some of that syrup back! All the research we did over last fall and winter said that each tree should give us a minimum of 10 gallons of sap, which comes down to 1 quart of syrup (it's a 40:1 ratio!). The Kentucky weather basically laughed in our face!

We upgraded our sap collection method this year to bags instead of buckets! They were a little pricy, but worth it for sure! It made sap collecting a breeze. We didn't have to worry about taking the buckets down with rain, and it was super easy to dump the sap into food-grade 5-gallon buckets on collection days. The problem was that over half of the trees we tapped didn't produce!
We had around 19 taps, and only 4 or so trees consistently gave us any useable amounts of sap. The picture above was our one and only most productive day! Everything we read online, and everyone we talked to said we tapped the trees correctly. Finally, someone on a Backyard Maple Syrup Facebook group informed us that Harrodsburg, Kentucky is notoriously difficult! Soooo...we are blaming the weather!
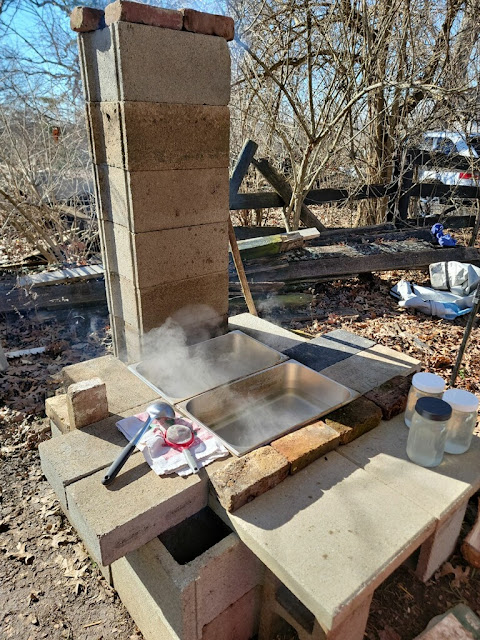
We also upgraded our boiling system this year! In the past two years, we've used a propane stove. But that can get expensive! So, we looked up some YouTube tutorials for evaporators made out of cinder blocks! We were so fortunate that all of these cinderblocks were extras we or my brother had laying around! It's basically a wood-burning stove top equipped with a spot for air intake, a spot for burning the wood, and a chimney to carry the smoke away from the syrup (to cut down on smoky flavor. Syrup is VERY EASILY flavored).

After filtering out all the bugs and dirt through cheesecloth, you slowly add the sap to the boiling trays. The tray closest to the chimney is the boiling pan, and the other tray is the warming pan. You pour the sap into the warming tray and then spoon it over to the boiling tray (making sure to maintain the boil) a little at a time until you have no more sap left! This process takes 4-5 hours, and we have to constantly feed the fire to keep the boil going. We also use a small strainer to filter off any foam that appears on the top of the boiling sap. The foam is where the impurities are, and it makes the filtering process downstream easier to stay on top of it.

Eventually, the sap starts to turn amber in color. When we empty the warming tray, we immediately fill it with water to keep the pan from warping. Then we boil, boil, boil the sap until it reaches a temperature between 211-214*F (depending on how long it's taking). Then we bring it inside to the kitchen, put it in a specific pan that we have (my stove is dumb and wouldn't boil with several of the pans we tried...took us 45 minutes to figure out it was the pan) and raise the temperature to 214*F.

Filter (though use the thiner one for the firs stage) to remove impurities. Then bring the temperature up to 219*F. This is a perilous stage that requires a good set (or three sets) of lungs to keep the sap/syrup from boiling over. It also takes forever.
Around 216*F or so, we start to check the Brix percentage, which shows the sugar content of the sap/syrup. Maple syrup needs to be between 66-68%. For us (and most people), this happens at 219*F, but we still liked to keep an eye on it. Around 218*F, it starts to get a film on top.

At 219*F, we filter it one last time, this time through a series of filters that includes a thinner filter and a thicker one. Then it's time to bottle!

Again, we calculated a minimum of 10 gallons of sap per tree, which would be 2 pints of syrup (1 quart) per tree. We tapped 19 trees this year, which means we *should* have gotten 38 pints of maple syrup! We ended up with 5 1/2 pints. Looking from the outside, it may seem like it's not worth it. It took us 8-14 hours every weekend for a boil just to get 1-2 pints at a time, and mom and I had to go for a drive every two days to check/collect sap. But the time we spent together was wonderful, my kids learned a lot about trees and sap collecting, we cleaned up some of the yard collecting sticks, and the flavor you guys...the flavor is amazing! I have bought regular pancake syrup from the store maybe 1 time in the past 3-5 years--otherwise, we've switched completely to maple syrup. And our maple syrup....our maple syrup tastes better than any maple syrup we buy at the store. It's AMAZING!
Aside from syrup, we had a few other projects on the farm!

We had to transport the tractor there because the logs were MASSIVE.

The kids had a great time playing on the stump while Sam worked, and I did what I could to help.

If you want to see how Sam moved these logs with his tractor, you can watch this YouTube Short.

Finally, we got both logs loaded in the dump trailer and transported them back home!

Sam noticed our water bill had gone up dramatically. It took him a couple days after work to verify with the water meter, but we did indeed have a water leak! The pipe where the water comes into the house just came loose. The rate of water loss increased drastically once he dug it up, but Sam was able to patch it up fairly quickly and get it re-buried in time for the freezing temps we had a few nights later.

Last year, I made a roadside sign so we could advertise what we have available for sale on the farm. I'm not so swift with paint brushes, so I used a sharpie to draw/color everything to get the crisp lines. Then I put a ton of poly overtop. Needless to say, sharpie fades in the sunlight, so by the time winter was over, most everything was faded and some signs were completely blank. I found water-resistant paint pens on Amazon and decided to give them a go. They worked fantastically! I'm super pleased with how the sign turned out.

ANNOUNCEMENT: If you live in the Harrodsburg area, you can now purchase our feather earrings at the Mercer County Chamber of Commerce on Main Street for $8 a pair.

We had to make a switch in animal feed. I'm not super happy about it because I LOVED the quality of feed from Sunny Pastures, but it was twice the price of McRays. We ended up buying over 20 bags of feed for only a little over $200. A similar purchase early this year from Sunny Pastures was $600-$700. SO bummed. 


Tiger Lily went through two electric fences to make friends with the boys, so she got pregnant a little earlier than we wanted. As a result, she had a small litter. Only 3 little girls.


They are the cutest, spottiest, little red piglets you've ever seen! Two of them are double wattled! They will be ready for purchase or herd share purchase the weekend of April 20!


We made St. Valentine puppets to celebrate Valentine's Day!


We weaned our first litter of the year at 8 weeks old! They are doing great hanging with the roosters and turkeys all day! We still have two available if you are looking to purchase a piglet or want to take part in our pork herd-share program.
Our second litter of the year was born, and the kids got to witness the birthing process!
After leaving his Christmas present in Bowling Green, Sam decided to design a smaller version of the soil blocker his parents got him so that we could start some of the spring garden (we are running a little late).
Version two worked great (or so I'm told!)The kids helped Daddy wet the soil and plant the cauliflower and broccoli seeds. We already have some broccoli sprouting! Sam moved them under the grow light, so we will keep an eye on their growth to see how the new soil mix and the soil blockers work!
We've been busy on the family side of things as well! In addition to impatiently waiting out this pregnancy....
We found a new way for William to practice his letters using the cars he loves to play with!
We helped the kids pick out things to give up and start for lent, and we talked about Ash Wednesday and what would happen during mass. The kids enjoyed playing it out with Rylee's dolls.
We made a chain to count down to Easter (and Mena Grace's due date) using the appropriate liturgical colors of the vestments the priests would be wearing and put reminders on certain days to fast and abstain from meat.
Everyday they get to tear a chain off! Rylee keeps showing everyone Easter Sunday, and she was so excited about it she took a picture on my phone (that I just discovered).
The kids and I FINALLY made it to their 100th day of school! So proud of them for all their hard work, and so proud of myself for consistently sticking with it! Rylee will *officially* be in school this fall. I will have to submit a report to the board of education letting them know I will be homeschooling her. We named our homeschool the St. Isidore Academy. St. Isidore is the patron saint of farmers.
Luke is still refusing to talk other than a few basic words, but he is 100% boy and into everything!
(This is mud...thank goodness)
A little note about Mena Grace. The first 3D ultrasound we got of her they noticed that her bladder had not emptied and it was very, very full. Apparently, this is a big deal, so they had us come back a week later to check on her again. This time her bladder was empty (praise be to God). We were excited to get to see her again! The first time she was sucking on her bottom lip and the second time I swear they got a picture of her with her eyes open!
Lastly, please enjoy the recipe for these DELICIOUS HOMEMADE POPTARTS!
Homemade Poptarts
Ingredients:
Tart
Jelly
Glaze:
Powdered sugar
Milk or heavy cream
Instructions:
1. Roll the pie crust to a thickness of 1/8" or thinner.
2. Cut the dough into 3" x 4" rectangles. Refrigerate the dough scraps while you prepare the rectangles.
3. Spread a spoonful of jelly along the inside of 1/2 of the rectangles leaving about 1/4-1/2" space around the edges.
4. Place an empty rectangle on top and use a fork to press the edges together.
5. Place the poptarts on a parchment paper lined cookie sheet and set in the freezer.
6. Preheat oven to 350*F.
7. Grab the scrap dough out of the fridge and re-roll it out to 1/8" or thinner.
8. Repeat steps 2-5 until there is no dough left.
9. Bake the pop tarts for 25 minutes or until the top is somewhat crispy.
10. Allow to cool for 10 minutes while preparing the glaze.
Glaze instructions
1. Mix 1-2 cups of powdered sugar with heavy cream or milk until the consistency is perfect for drizzling.
2. Once pop tarts have cooled for at least 10 minutes, drizzle glaze on top.
3. Serve immediately and enjoy!
Notes:
- you can add sprinkles to the top of the icing
- you can also substitute jelly for cinnamon sugar.
Pax Domini cum spirito tuo temper sit,
Torey, Sam, Rylee, William & Luke
Check out our Etsy shop!
Follow us on Facebook
Subscribe to us on YouTube!
Comments
Post a Comment